Chocolate Chip + Hazelnut Protein Bars
OK. So, honestly, protein bars have never really been a thang in my life. In fact, the whole “protein” thing has never really been a big thing in my life in general. However, after the last few years of my body going through some intense bouts of illness, malnourishment and high levels of stress the need for protein increased ten-fold.
Especially when I was dealing with SIBO for the whole of last year – protein rich foods seemed to the only thing that I could digest and actually assimilate with any ease. This made me re-evaluate my relationship to protein. I started to actually understand how it really does give immensely sustaining, grounding, important energy to the body-mind.
Having said this, we definitely do not need as much protein as is marketed in Western food culture. And often, the sources of protein we eat are not easily digestible, high quality sources of protein that are readily used by the body. So, all I can say without going on for pages and pages (which may be an idea for another post!) is to work with yourself and your unique constitution/body to figure out (through exploration of different foods and protein sources) which ones work best for you. According to Ayurveda, each individual and each individual constitution has different requirements of protein and different sources thereof, that best support that specific dosha. So, really: explore explore explore and be open to really hearing your body’s own wisdom when discerning what to eat to best support yourself.
Now back to these bars.
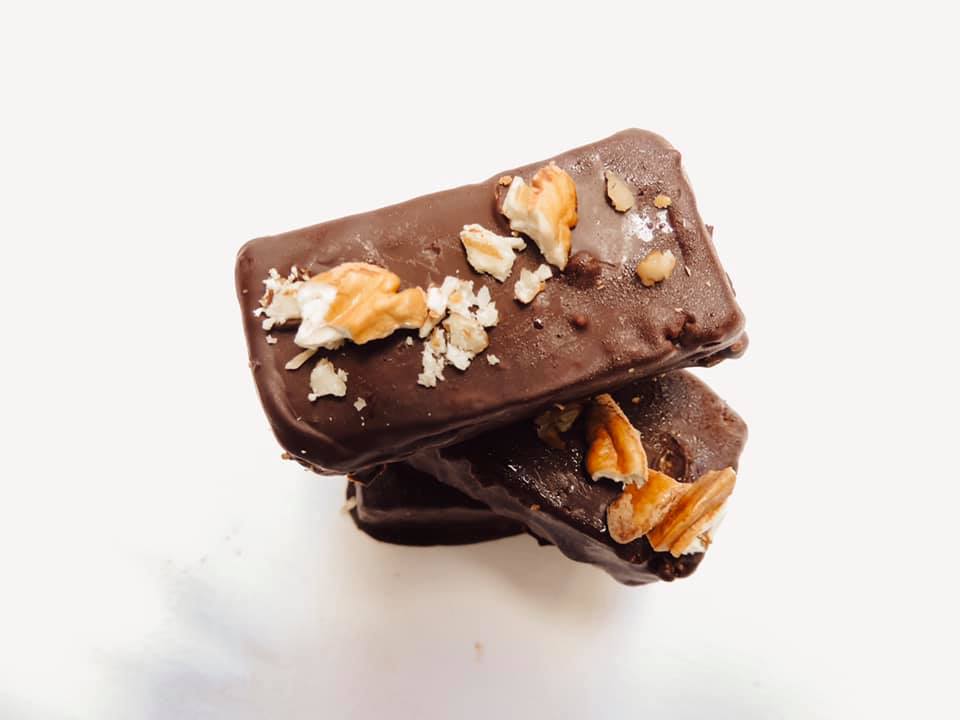
I don’t think protein bars ever looked dis good. I’m excited. I mean …
Chickpeas.
Dates.
Oats.
Banana.
Basically, all of the good ting tings.

This recipe is not only just fantastically easy to make, but these beauties actually keep in the fridge or freezer (if you like serving them super cold and refreshing like in the middle of Summer) for ageees which is a major bonus in my book. Often when I make baked goods, once I’ve had a few of the whatever it is I have baked, I don’t want any more for a while but obviously freshly baked goods don’t keep that well (cue the stale-ness) so I either have to give some away to friends or family (which itself is lovely). Or, if I don’t do that in time, things end up going to waste. Which is the worst ever. Food waste should just never be a thing in anyone’s home.
But essentially, besides the fact that these are just scrummy and super packed with goodness, the fact that I can make and store them for ages is a big bonus to me. Especially with my busy University schedule.
Ingredients:
· 1 heaped cup of washed and drained chickpeas
· ½ cup of medjool dates or other soft dates (I used 100g pitted Zamli dates)
· 1.75 cup of dry quick oats
· Half banana (45g)
· 3 tablespoons of nut butter of choice (I used hazelnut but peanut butter or any other kind is also great!)
· 2 tablespoons of raw pumpkin seeds (optional)
· 2-3 tablespoon of cacao nibs
· 1 tablespoon of honey (or maple if you are wanting to keep it strictly vegan)
· 1 tablespoon of ground espresso powder
· 1 tablespoon of hemp powder
· 1 -2 teaspoon ground cinnamon
· ¾ teaspoon of Himalayan salt
· 100g dark, high quality chocolate for melting and enrobing
Method:
1. Place the oats into the blender and blend until ground nicely. Add in the pitted dates, the chickpeas, the banana, the honey, the espresso powder, the hemp, the cinnamon, the salt and the nut butter and blend on high until everything forms together into a big ball.
2. Once you have your ball of “dough” place it into a bowl and now add in the cacao nibs (and the pumpkin seeds you are adding those too).
3. Press into a baking dish lined with parchment paper - forming it into the thickness you’d like it to be. I did mine about 3cm thick.
4. Place into the fridge or freezer to firm up a bit. Cut into your preferred sizes and shapes when ready to drench in chocolate.
5. To melt the chocolate, make a bain-marie (in other words bring a pot with a bit of water at the bottom to heat and place a bowl over the top, ensuring that the water doesn’t touch the bowl). Add the chocolate into the bowl and stir until melted.
6. Coat each bar in the chocolate and then place on a baking tray lined with parchment paper to avoid spillage of chocolate everywhere. Once the chocolate dries, place the bars into a container and store in the fridge or freezer for further munching.
7. ENJOY!
